TweetDeck is best described as a Social Media Dashboard for the Management of Twitter Accounts. It started off as a separate company led by Ian Dodsworth, but was acquired by Twitter in 2011 for £25 million. Like the other clients mentioned above, it uses the Twitter API to deliver news feeds and allows users to respond to tweets and follow others.
It is currently the most used client for Twitter after the actual Twitter website. Although the native TweetDeck Client Windows has ceased any further development, there are still clients available for the Mac OS X, Google Chrome and of course as a web app on the following link – https://www.tweetdeck.twitter.com. The power users will appreciate the presence of keyboard shortcuts for common functions.
Earlier, TweetDeck had support for other social networks such as Facebook, LinkedIn, MySpace, etc. apart from Twitter, but since 2013, it dropped support for other networks and focused more on the core Twitter experience. The most striking feature of TweetDeck is its ability to display multiple timelines at once. It also includes a lot of the more advanced features such as −
- Multi-Account Support
- Scheduling Tweets
- Building Collections, etc.
It can also delegate access to teams wherein multiple people can share a Twitter account without having to share the password.
Exploring the TweetDeck User Interface
The TweetDeck interface is divided into columns of different aspects of the Twitter profile. The columns can be customized based on what one would like to see in the newsfeed. The typical TweetDeck interface has a four-column setup that displays Home, which contains the streaming news feed made possible by the Streaming API, the Notifications feed, the Activity feed and the Direct Messages or the Messages feed.
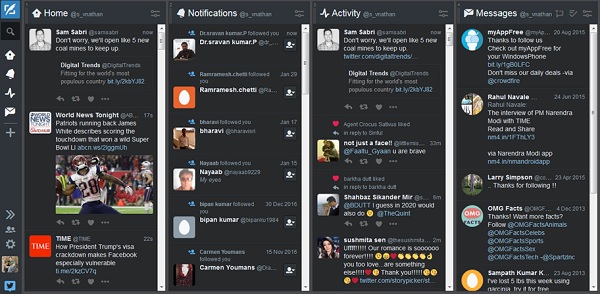
Each of these columns are dynamic and continuously updated in real time giving a sense of a dashboard. The icons to the extreme left of the interface contains options for composing a new tweet, searching for users and topics and an icon for each of the columns selected for display showing the number of unread or new items. One can add additional columns from here. It also contains options for managing user accounts and settings for keyboard shortcuts and search terms.
Customization Options of the Side Panel
The side panel allows composing a new tweet and searching Twitter for people, topics, etc. The panel shown in this example (the screenshot beside) is configured by default to show the following options −
- Home
- Notifications
- Activity
- Message feeds
The positioning of these feeds can be interchanged simply by dragging and dropping them in the desired order. By clicking on the Collapse Button simply collapses the panel into simple icons giving more screen space for other panes.
The Accounts Button allows adding multiple accounts or joining a team which we will be reviewing in the subsequent chapters.
The Settings Panel allows configuring a lot of settings some of which reflect across both Twitter and TweetDeck.

Finally, clicking the profile picture, brings up a pop-up showing the Twitter Profile of the current logged in account.
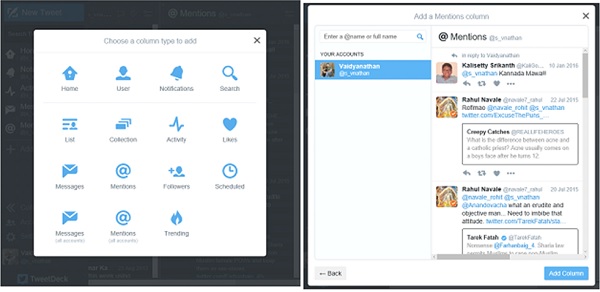
The Add Column button brings up a pop-up showing the various other columns that can be added. One can simply add columns by clicking on a column type from the available list. Clicking on a column type will further open options to be included. For example, I have chosen to add the Mentions column to my timeline.
Clicking on the Mentions column will open options for adding the mentions that I have been a part of. I can also choose to include Mentions of other Twitter accounts like that of a celebrity for example.
Finally, press Add Column at the bottom right to add the column to your main landing page. The options displayed are contextual and vary based on the type of the column chosen. A user can have as many columns as needed if it doesn’t feel that the interface is getting cluttered.
The Settings Menu
The Settings menu presents the following options –
- General
- Link Shortening
- Mute
Let us now discuss each of these in detail.
General Settings
In the General Section, you can choose to stop the real time streaming of tweets which is useful if there is a whole barrage of tweets and you need time to keep up with each of them. The Notifications can be turned on or off and it also includes a filter for displaying sensitive media. There are options to choose a Dark or a Light theme. A dark theme is particularly useful when using the app on AMOLED displays. It saves battery power and prevents screen burn-in and is also easy on the eyes.
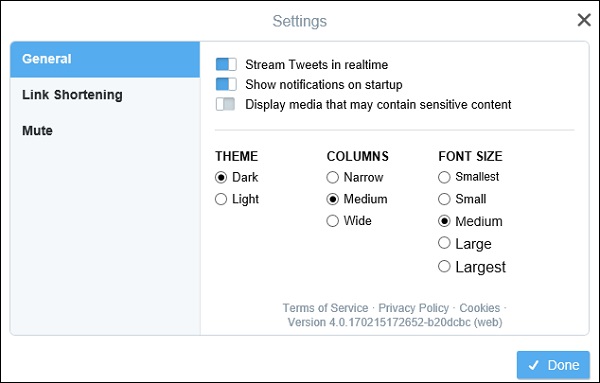
The width of the columns can be set as narrow, medium or wide. It is worth noting that there is no free size resizing option i.e. you cannot drag the columns to occupy a desired width on the main interface and you are left with one of these three choices.
Finally, there is the option to change the font size from smallest to largest – again, no custom sizes possible.
Link Shortening
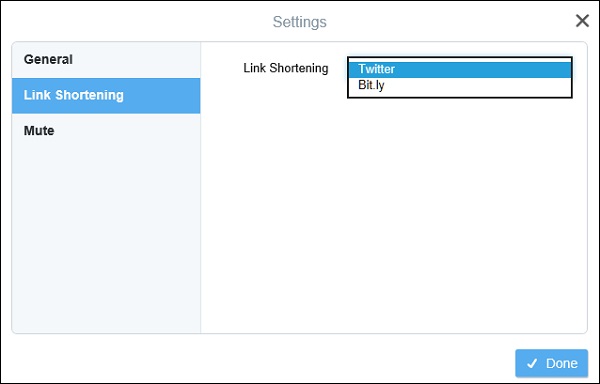
The Link Shortening section enables using Twitter’s t.co URL shortening or the Bit.ly URL shortening service. URL shortening is often required to condense long URLs and accommodate them along with the actual tweet as tweets are limited to just 140 characters.
Outside the app, you can of course, use other third-party URL shortening services as well.
Mute Settings
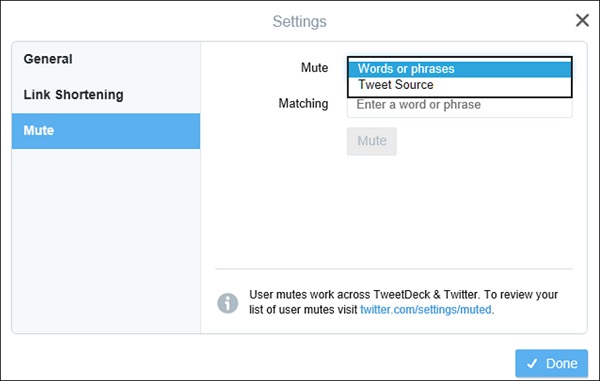
The Mute section offers options to mute certain words or phrases which you don’t want to see on your timeline. For example, if too many political news are dominating your feed, you can mute specific news sources or words, so that they don’t show up and distract your view.
Of course, this is completely reversible. It is interesting to note that these preferences also apply simultaneously to your main Twitter profile.
Press Done to return to the main newsfeed.
TweetDeck Panel Customization Options
Apart from the global settings, each panel added to the main interface has individual options for customization as well. Let us have a look at an example of the Home panel and explore the options it presents.
Clicking on the Filter icon on the top right of the panel opens a flyout detailing various options related to that panel. Here we see for the Home panel that the options are categorized into –
- Content
- Users
- Alerts
- Previews
Let us now discuss each of these in detail.
Content − Opening the content drop down allows you to customize your feed to show all tweets or just tweets with GIFs, images, videos, vines, links, etc. You can also enter specific keywords to include or exclude and choose whether to show retweets or not.
Users Menu − The Users menu allows you to display tweets by specific users or filter only verified ones (such as those of celebrities or popular brands).
Alerts Menu − The Alerts menu allows you to specify sounds and desktop notifications for every update that occurs (Note – Your browser may ask for permission to enable notifications).
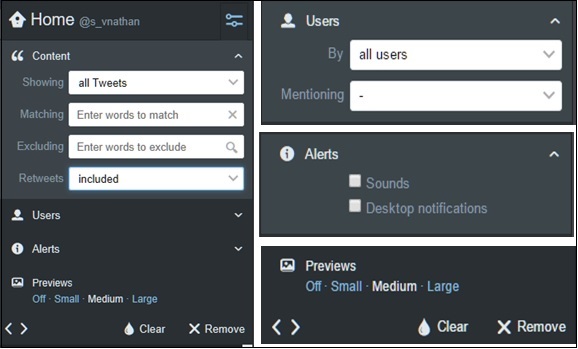
Preview Options − The Previews options allows for adjusting the size of the previews of photos or videos displayed. These drop downs are mostly common for all the panes.
Clear Button − The clear button clears the current visible data in the pane.
Remove Button − Clicking on Remove will remove the pane completely. Of course, the pane can be re-added via the Add Column button as described earlier.
Some panes such as Notifications, Messages, etc. contain additional options apart from these. The bottom row of the interface has two arrows. These arrows help in shifting the position of the pane left or right.
Simply exploring the interface can unearth a lot of options and allows the user to customize TweetDeck exactly as per his/her needs. The options presented are much more than what Twitter natively offers on either its official website or app and we can see why TweetDeck and other clients are quite popular among Twitter aficionados.