TweetDeck’s Teams feature is one of its USPs. The Teams feature allows delegating access to other TweetDeck users without the need for sharing passwords. However, all team members need to use TweetDeck for this purpose. Team members can have one of the following roles −
-
Owner − Manages passwords and login verification; invites others as admins or contributors and can act on behalf of the team (tweeting, retweeting, direct messaging etc.)
-
Admin − Invites others as admins or contributors and can act on behalf of the team.
-
Contributor − Acts on behalf of the team.
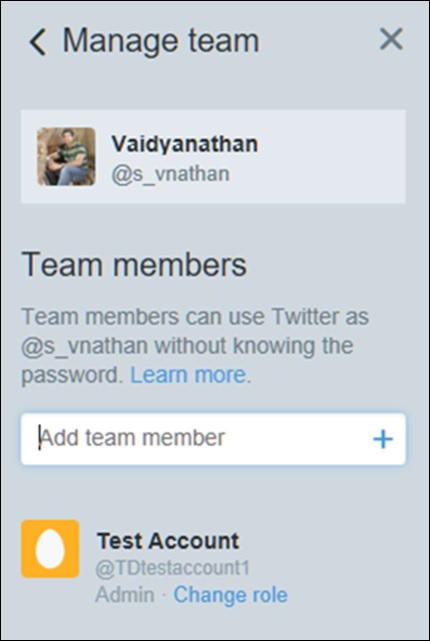
To start a Team, go to the Accounts page on the side pane and under the desired profile to be designated as Owner, click on Team @(username). It opens a Manage Team flyout where you can add your team members and authorize them. The authorized team members will receive an email invite which needs to be accepted before they can take on the designated roles. They will then need to login to their TweetDeck app and accept the invite in the Accounts section of their app.

The added team members can be assigned as Admin or Contributor roles by clicking on Change Role for each team member.
While only the Owner gets to manage the password and login settings, both Owners and Admins can manage the team.
Contributors can only post and cannot manage team accounts.
It is also possible to remove a member from the team by clicking on Change Role next to the user and selecting Remove from team.
For the Teams feature to be effectively utilized, the following criteria must be met –
-
All team members must be using TweetDeck and accept the invitation email.
-
Team members should allow invitations in the ‘Twitter for teams’ section in the Privacy and Safety settings on twitter.com
Tweet Scheduling
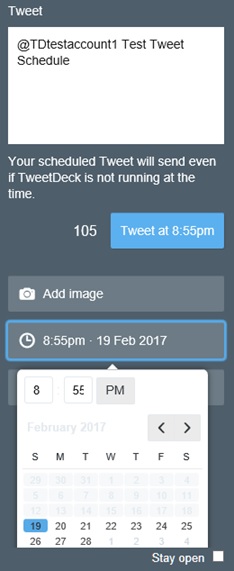
TweetDeck allows scheduling tweets to be sent at a specified date and time. For multiple accounts, tweets can be scheduled for each of them. For scheduling a tweet, click on the New Tweet button on the side pane, type out your tweet and click on Schedule Tweet. This allows the option to select a date and time on the calendar.

Simply select the desired date and time and click on Tweet to send the tweet at the specified time.
Changed your mind about a scheduled tweet? No problem! It is possible to view all your scheduled tweets by adding a Scheduled column to the list of columns. Interestingly, the Scheduled column allows showing the merged schedules from all the accounts added to TweetDeck. Once the tweet is scheduled, you can even exit the app in full confidence that the tweet will be posted as per the schedule.