When we refer to resizing an image, we mean changing the dimensions (width and height) of the image while maintaining its aspect ratio. Aspect ratio refers to the ratio of the width to the height of the image. Resizing can be done to either make the image larger or smaller.
When you resize an image, you are altering the number of pixels in the image and potentially changing the visual representation of the content.
Resizing an Image in Mahotas
To resize an image in Mahotas, we can use the imresize() function provided by the library.
This function resizes the image using an interpolation algorithm and returns the resized image as a new NumPy array.
The interpolation algorithm is the method used to fill in the gaps between known pixel values when resizing or transforming an image. It estimates the missing pixel values by considering the values of neighboring pixels.
Interpolation helps in creating a smooth transition between pixels, resulting in a continuous image.
The imresiz() function
The imresize() function in Mahotas takes two arguments − the image to be resized and the target size as a tuple (new_height, new_width). It resizes the image while maintaining the aspect ratio and returns the resized image as a new NumPy array.
Syntax
Following is the basic syntax of the imresize() function in mahotas −
mahotas.imresize(image, nsize, order=3)
Where,
-
image − It is input image that you want to resize.
-
nsize − It specifies the desired size of the output image. It should be a tuple (height, width) representing the target dimensions.
-
order (optional) − It determines the interpolation order to beused during resizing. It has a default value of 3, which corresponds to bicubic interpolation.
You can also choose other interpolation orders such as 0 (nearest−neighbor), 1 (bilinear), or 2 (quadratic).
Example
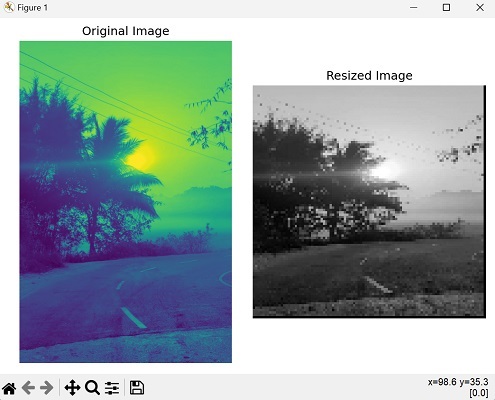
In the following example, we are trying to resize an image to a specific width and height using the imresize() function −
import mahotas as mh
import numpy as np
import matplotlib.pyplot as plt
image = mh.imread(''sun.png'', as_grey = True)
print(''Size before resizing :''+'' ''+str(image.size))
print(''shape before resizing :''+'' ''+str(image.shape))
resize=mh.imresize(image,[100,100])
print(''Size after resizing :''+'' ''+str(resize.size))
print(''shape after resizing :''+'' ''+str(resize.shape))
# Create a figure with subplots
fig, axes = plt.subplots(1, 2, figsize=(7,5 ))
# Display the original image
axes[0].imshow(image)
axes[0].set_title(''Original Image'')
axes[0].axis(''off'')
# Display the resized image
axes[1].imshow(resize, cmap=''gray'')
axes[1].set_title(''Resized Image'')
axes[1].axis(''off'')
# Adjust the layout and display the plot
plt.tight_layout()
plt.show()
Output
After executing the above code, we get the following output −
Size before resizing  : 1079040
shape before resizing : (1280, 843)
Size after resizing   : 10000
shape after resizing  : (100, 100)
The image obtained is as shown below −

Using Bilinear Interpolation
Bilinear interpolation is an interpolation algorithm commonly used for image resizing. It estimates the new pixel values by considering the weighted average of the four nearest neighboring pixels.
These four pixels form a square around the target pixel, and their values contribute to determining the new pixel value.
To resize an image using the bilinear interpolation in mahotas, we need to specify the interpolation order as 1 in the imresize() function.
Example
In here, we are trying to resize an image using the bilinear interpolation −
import mahotas as mh
image = mh.imread("nature.jpeg", as_grey = True)
# Specifying the desired width and height
new_width = 800
new_height = 600
# Resizing the image using nearest-neighbor interpolation
resized_image = mh.imresize(image, [new_height, new_width], 1)
print(resized_image)
Output
The output obtained is as follows −
[[193.71 193.71 193.71 ...  208.17 208.17 0. ]
[193.71  193.71 193.71 ...  208.17 208.17 0. ]
[193.71  193.71 193.71 ...  208.17 208.17 0. ]
...
[ 98.49  98.49  95.49 ...   7.11   4.85   0. ]
[ 90.05  90.05  94.12 ...   5.33   5.07   0. ]
[ 0.     0.     0. ...      0.     0.     0. ]]
Using Quadratic Interpolation
Quadratic interpolation is also an interpolation algorithm commonly used for image resizing. It estimates the new pixel values by considering the weighted average of nearby pixels.
Quadratic interpolation is particularly useful when working with curved or non−linear data.
In simple terms, it involves fitting a parabolic curve through three neighboring pixel values to approximate the value at a desired position between them.
To resize an image using the quadratic interpolation in mahotas, we need to specify the interpolation order as 2 in the imresize() function.
Example
Now, we are trying to resize an image using the quadratic interpolation in mahotas −
import mahotas as mh
image = mh.imread("nature.jpeg", as_grey = True)
# Resizing the image using nearest-neighbor interpolation
resized_image = mh.imresize(image, [700, 550], 2)
print(resized_image)
Output
Following is the output of the above code −
[[193.71 193.71 193.71 ... 208.17 208.17 0. ]
[193.71  193.71 193.71 ... 208.17 208.17 0. ]
[193.71  193.71 193.71 ... 208.17 208.17 0. ]
...
[ 92.2   93.49  94.12 ...  6.22   6.22   0. ]
[ 92.27  98.05  92.42 ...  6.33   4.85   0. ]
[ 0.     0.     0. ...     0.     0.     0. ]]